The Pursuit of Good Eating

The Smell of Muffins in the Morning

IMG_20140715_110921_333~2A rainy day outside, Diana Krall on the stereo & homemade blueberry muffins in the oven = a pretty perfect little morning.

It has been a beautiful rainy morning here in Birmingham, ideal for a blueberry muffin breakfast. Perhaps it seems more wonderful than normal as we are finally settled into our new place! Having been in transition since our December wedding, it feels so good to wake up in the morning and walk into my very own kitchen.

Yesterday I brought home some fresh blueberries which looked too tantalizing to pass up (not to mention they were on sale!) This immediately got me thinking breakfast…

With nothing scheduled this morning, I took the time for a baking endeavor and came up with this yummy morning treat. You will love the blueberries that pop in your mouth as you bite into the sweet crust laced with coconut sugar.

If you try anything new this week, let this be it! They are well worth it and pretty simple at that. And hey– if blueberries aren’t your thing, any fresh berry will do! Think outside the box.

Blueberry Vanilla Almond Muffins

Makes 12 Muffins

  • 1/2 C. of Coconut Oil (Melted)
  • 1/4 C. of Honey
  • 1/4 C. Unsweetened Vanilla Almond Milk (Can also use rice milk)
  • 1/4 C. Coconut Sugar
  • 2 Eggs
  • 1 tsp. of Vanilla Extract
  • 1/2 tsp. of Pure Almond Extract
  • 1 C. of All Purpose GF Flour
  • 1 1/2 C. of Almond Meal
  • 1/2 tsp. of Baking Soda
  • 1/2 tsp. of Salt
  • 1 C. of Fresh Blueberries (or preferred fruit)
  1. Preheat your oven to 350 degrees.
  2. Grease a muffin pan with coconut oil (or use liners! I would recommend it 🙂 )
  3. Add all wet ingredients together, as well as coconut sugar.
  4. Beat well.
  5. Add all dry ingredients.
  6. Beat well.
  7. Add your blueberries and gently fold into your muffin batter.
  8. Spoon into muffin pan.
  9. Pop in the oven for 15-18 mins.
  10. Enjoy the scrumptious smell that fills your home (oh, and taste, too!)

Note: You can also use frozen berries if you wish; however, it will leave your batter a different color. If you want pretty muffins, use fresh. If you don’t mind greenish-blue muffins, then frozen works great, too!


Beating the Heat

IMG_20140618_143539_482~3

Pineapple Cooler with Strawberries and Mint

I am an adopted southern woman. Having grown up in Colorado, it has been a beautiful adventure, not only falling more in love with my husband, but my new State of Alabama. It will be a year next month since moving to the Heart of Dixie. I can hardly believe it. Where does the time go!?

However, with the charm of southern living also comes one other little thing: the heat. And when I say heat, I don’t mean slightly warm. More like absolutely sweltering, I think I’m gonna pass out, why did I even shower? kinda heat! Since setting my heart on refinishing some furniture this Summer (for our new place), there is only one spot to do all that refurbing: outside. (Did I mention it’s almost July?)

As much as I love being creative and trying new things (thank you Pinterest!), the timing for this endeavor may not have been the best. Haha. Needless to say, after several hours of sanding and painting in the sun, I was ready for a thirst quencher!

A friend of ours, Ms. Esther, told us about using the rinds of a pineapple to make pineapple water (brilliant). What a savvy thing to do! Who wants to waste all that flavorful, liquid gold? Well, this made a perfect base for today’s new concoction: a Pineapple Cooler with Strawberries & Mint. Wanna beat the heat? Give this little baby a try!

Pineapple Cooler with Berries and Mint

Single Serving

  • 1 C. of Pineapple Water
  • (For Pineapple Water: The Remaining Rinds of 1-2 Pineapples & Water For Boiling)
  • 1 Tbsp. of Honey
  • 1/2 C. of Sliced Strawberries
  • Fresh Mint (Spearmint, Apple Mint, Peppermint, etc. Any will do!)
  • Ice
  1. Bring a pot of water to boil. Add pineapple rinds and boil for about twenty minutes.
  2. Remove from heat and allow to cool.
  3. Remove rinds.
  4. Store in the fridge until cold.
  5. Fill half a glass with ice.
  6. Top with sliced berries and honey.
  7. Pour pineapple water over the top.
  8. Cut fresh mint into glass and stir.
  9. Garnish with a whole strawberry and mint leaf.
  10. Be refreshed!

Note: You can mix everything together in one large pitcher if you prefer (great for parties!) I just made mine in a single glass today. This ensures lots of berries and mint for each one! If making in a pitcher, consider adding more berries and honey than recipe calls for.


Let Her Eat Cake

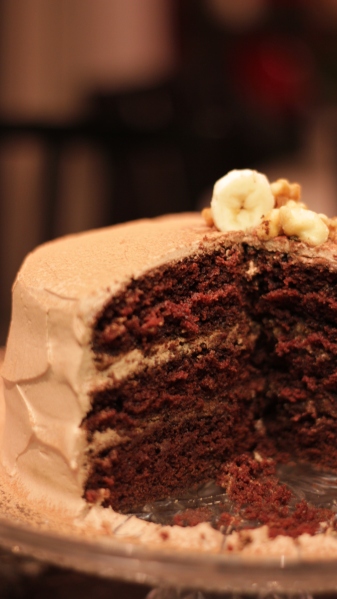
IMG_5561Living without chocolate can make a girl go crazy! A woman needs her fix, that marvelous indulgence to calm her need for something sweet (and I don’t mean a Fiber One bar). As you may have found, there is a comforting addiction in the rich goodness of Ghirardelli chocolate. Whether it be in cake or candy form, it’s simply magical.

As my birthday approaches, I need a good old-fashioned chocolate cake recipe. One that not only LOOKS like a genuine cake, but one that TASTES and FEELS like the real stuff, without all the sugar and dairy. And while we’re at it, why not melt a Chocolate Ghirardelli Bar into the mix? While the bar is 100% Unsweetened Cocoa, you won’t know the difference! When all is said and done, you’ll never guess this cake is good for you. Yes, it’s true. Now let the woman have some cake! After all, life is like a box of chocolate cake… (or something along those lines.)

Chocolate Indulgence Cake w/ Whipped Coconut Cocoa Frosting:

Serves 10-12

For the Cake:

2 C. of Gluten Free Flour (King Arthur’s)

1 1/2 C. of Coconut Palm Sugar

2 tsp. of Baking Soda

1/2 tsp. of Cream of Tartar

1/2 tsp. of Sea Salt

1 C. of Earth Balance Butter (Soy Free)

1 1/2 C. of Almond Milk

1 Tbsp. of Apple Cider Vinegar

3 Large Eggs

1 1/2 tsp. of Vanilla

1 Ghirardelli 100% Cacao, Unsweetened, Chocolate Baking Bar (Melted)


For the Frosting:

2 Cans of Refrigerated Coconut Milk

1 1/2 tsp. of Vanilla

2 tsp. of Honey

3-4 Tbsp. of Cocoa Powder

1 Tbsp. Coconut Sugar

10 Drops of Liquid Stevia English Toffee Flavor (optional, but recommended)

15 Drops of Liquid Stevia Chocolate Flavor (optional, but recommended)


CAKE INSTRUCTIONS:

  1. Preheat oven to 350 degrees.
  2. In a bowl or stand mixer, combine Earth Balance butter, eggs, vanilla and coconut sugar. Beat on medium speed for two minutes.
  3. Add almond milk, apple cider vinegar and melted Ghirardelli bar. (If melting in microwave, stir every 30 seconds as to not scorch the chocolate.)
  4. Beat for 1 minute.
  5. Add flour, baking soda, cream of tartar and sea salt. Mix on low to medium speed until well combined.
  6. Spread into greased and floured cake pans.
  7. Bake 18-20 minutes.
  8. Cool completely in pan.


FROSTING INSTRUCTIONS:

  1. In a standup mixer with whisk attachment: empty the solidified coconut milk into your mixing bowl (set aside the coconut water which has separated in the can. This is great for adding to smoothies!)
  2. Add vanilla, honey, cocoa powder and liquid stevia(s).
  3. Beat on medium/high until peaks begin to form.
  4. Add coconut sugar (melted, with a tsp. of water in the microwave.)
  5. Continue to beat until the cream is peaked and fluffy!
  6. Store in the refrigerator until ready to frost cake.
  7. Frost between cake layers, as well as the outside, using a spatula. Spread liberally!
  8. After frosting, refrigerate cake until ready to eat.
  9. Indulge!

Notes: Liquid Stevia can be purchased at your local health food store or here http://sweetleaf.com/products/sweet-drops-products. This cake is delicious with toasted walnuts and bananas, served alamode with Vanilla Coconut Bliss Ice Cream!


LAMB: The Other Red Meat

IMG_5496There is a uniquely robust and earthy flavor that can only be found in the taste of lamb. For the first time, I tried my hand at making the deliciously lean meat this afternoon, paired with roasted garlic potatoes and carrots. The vegetables were a lovely complement to the rosemary lamb shoulder chop.

Lamb is certainly not common American fare, making it a more foreign and undervalued main course in the standard American kitchen. However, this particular cut is quite inexpensive, yet incredibly satisfying and simple when prepared. While it appears and sounds a bit fancy, it is quite effortless. Try it for yourself! It definitely breaks the chain of ordinary weeknight meal planning.

Note: Lamb is a wonderful source of protein, as well as vitamins B2, B3 and B12. Vitamin B2 is beneficial for healthy skin and vision, aids in producing red blood cells and even supports in breaking down calories. B3 is essential for lowering cholesterol and B12 helps promote a healthy nervous system. Even more reason to make this savory dish!

Rosemary Lamb Shoulder with Roasted Vegetables

Serves 2

For the Lamb-

  • 2 Lamb Shoulder Chops (preferably hormone, antibiotic-free)
  • Olive Oil
  • Sea Salt
  • Pepper
  • 1 Tbsp. Fresh Rosemary

For the Vegetables-

  • 2-3 Red Potatoes
  • 1 Bag of Baby Carrots
  • Olive Oil
  • Sea Salt
  • Pepper
  • 1-2 tsp. Minced Garlic
  1. Take your lamb out of the refrigerator and let sit in room temperature while preparing vegetables.
  2. Thinly slice your potatoes. Fill a glass baking dish with cut potatoes and baby carrots.
  3. Liberally coat vegetables in olive oil, salt, pepper and minced garlic.
  4. Bake at 400 degrees for about 35 minutes. For additional texture, broil until golden brown after baking
  5. Meanwhile, prepare your lamb. Rub each chop vigorously with olive oil, salt, pepper and fresh rosemary. No need to finely chop your rosemary.
  6. As the vegetables finish, turn your oven’s broiler on HI.
  7. Broil lamb on HI 10-12 minutes, turning each chop over half way through cooking time.
  8. Let your meat rest for about five minutes before serving.
  9. Plate and garnish with fresh rosemary.
  10. Enjoy the beautiful meal you’ve made!

Now THAT’S Good

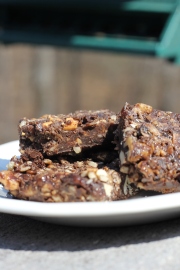
IMG_5485Why is it, that when we think of a snack that’s good for us, we automatically think it’s going to taste bad? That’s because in many cases, that is EXACTLY what happens. Health foods are often missing two key ingredients: flavor and satisfaction.

So often I find myself wanting for more. While it may technically be good for your body, health food has a bad rap for sometimes leaving your tummy and taste buds suffering.

For instance: the other day I picked up two new granola bars from my local health food store. To have them on hand is great for on-the-go snacking, as well as for an afternoon pick-me-up. However (to my dismay) they absolutely screamed health food bar. When I bite into a snack bar, I don’t want to feel like I just ate bird seed with an essence of dirt. I think we’ll leave that for the birds!

This weekend, my husband and I camped out in our new tent. In need of some good fuel, I set out to make a snack bar that’s not only nutritious, but one that we actually want to eat! Thus, the Cocoa Crunch Bar came to be.  And let me just say… you will want more. Brett and I were like two little piglets, gobbling up their sweet & salty goodness. We almost felt naughty, like we were chowing down on snicker’s bars. The kicker: we didn’t have to feel a single bit of guilt. It’s all good.

Try for yourself! It’s well worth the effort.

Cocoa Crunch Bars:

  • 2/3 C. Salted Cashews
  • 2/3 C. Walnuts
  • 2/3 C. Raw Sunflower Seeds
  • 4 Dried Figs
  • 4 Dates
  • 10 Prunes
  • 1/3 C. Shredded Unsweetened Coconut
  • 2 Tbsp. Cocoa Powder
  • 1 tsp. Cinnamon
  • 1 tsp. Sea Salt
  • 1/4 C. of Honey
  • 1/3 C. Coconut Oil
  • 1/2 C. Almond Butter
  1. Crush your cashews and walnuts until broken into fine pieces. (I put mine in a bag and used a meat tenderizer. You can also use a processor.)
  2. In a mixing bowl, add all ingredients together except for the Coconut Oil and Almond Butter.
  3. Next, melt your Coconut Oil and pour over the mixture.
  4. Then, do the same with your Almond Butter.
  5. Mix everything together.
  6. Pour into a greased casserole dish.
  7. Bake at 300 degrees for about 30 minutes.
  8. Let cool.
  9. Put in refrigerator until fully set.
  10. Cut and eat!

Note: if you don’t have figs, dates or prunes on hand, that’s okay! Get creative! You can easily substitute with raisins, dried fruit, etc. You can also use different nuts like pecans or almonds. Do what you like and make them your own!

A Taste of French Cooking

Ratatouille Bubbling in the Oven

Ratatouille Bubbling in the Oven

In the words of Chef Gusto, “Anyone can cook!”

Being a major Disney/Pixar buff, the beloved film Ratatouille is one of my very favorites. Combine a love of Disney with a love for all things French and, well, it’s a match made in heaven!

Since first seeing the film back in 2007, I have had a hankering to try my hand at making Remy’s Ratatouille. It seemed simple enough and I always enjoy trying something new. Well, it may be 2014, but I can finally say I’ve done it! I will admit… it was absolutely delicious! In fact, I snuck some in before breakfast this morning.

A bit of background: Ratatouille was originally created in 18th century France, most likely in the region of Nice or Provence. It is an exquisite way to utilize fresh vegetables. The loveliest part (aside from its taste, of course) is that you can make it your own with any vegetables you have on hand. Ideally, Ratatouille includes: zucchini, yellow squash, tomato and eggplant.

Simple and completely good for you, here is a traditional Ratatouille recipe (sans eggplant) with a fresh twist from Jessica Jo’s Kitchen:

Ratatouille

Serves 4-6

For the sauce:

  • 5 Roma Tomatoes
  • 1 Yellow Onion, Chopped
  • 1/2 tsp. Salt
  • 1/2 tsp. Minced Garlic
  • 1/2 tsp. Oregano
  • 1/2 tsp. Basil
  • 1 tsp. Apple Cider Vinegar
  • 1 tsp. Honey (preferably raw)

Remaining Ingredients:

  • 1 Green Bell Pepper, Chopped
  • 1 Orange Bell Pepper, Chopped
  • 1 Yellow Squash
  • 1 Zucchini
  • Fresh Basil
  • Goat Cheese (or other white cheese of your choice)
  1. Blend all sauce ingredients together well in a blender or processor.
  2. Heat a skillet with olive oil on Med/High heat.
  3. Add your chopped bell peppers into the skillet. Coat well with a bit more olive oil, salt and pepper and sauté for about five minutes, or until just beginning to soften. You don’t want them mushy, just a bit more tender.
  4.  Grease a deep dish pie pan with olive oil.
  5. Cut your squash and zucchini into thin, round slices.
  6. Layer the bottom of your pan with your zucchini and squash, arranging them in a circular pattern.
  7. Alternate layers with sauce, sautéed peppers, sauce, zucchini/squash, etc..
  8. Coarsely chop basil and garnish top.
  9. Cover with more sauce and finally, the cheese of your choice. I used goat, but mozzarella or something similar is fine, too.
  10. Bake in a 375 degree oven for about 40 minutes. Broil cheese until bubbly and golden brown.

Note: this version is a bit juicy! I recommend serving it in a beautiful bowl and pouring the extra juice over the top.  This can be served as a main entrée or side dish.

Bon Appétit!

Sugar Coating the Truth

IMG_5435

The average American consumes around 22 teaspoons of added sugar every day.

Wow. That’s nearly 1/2 a cup! Imagine sitting down for breakfast to a bowl of refined sugar and a spoon. Eat up! You don’t want to miss the most important meal of the day! The truth is, we don’t have a clue how much sugar we’re eating on a daily basis nor where it’s hidden.

As my diet changed, I became a label reading machine. I was absolutely astounded to discover sugar hidden in foods that I’d always perceived as healthy and normal:

  • oatmeal
  • protein bars
  • ketchup
  • salad dressing
  • pasta sauce
  • yogurt
  • granola
  • dried fruit
  • peanut butter

Then there are the obvious contenders like:

  • soda
  • ice cream
  • donuts
  • sweeteners
  • pies
  • jelly
  • candy
  • cake

To be honest, we are already getting (or should be getting) our daily amount of natural sugar through our fruits and vegetables long before we’ve gotten to anything else. Oh, dear…

Sugar is a sweet carbohydrate that can be found in both processed and natural foods. Natural sugars (found in our fruits, veggies and grains) are important in fueling our body with energy (along with protein). However, processed and refined sugars serve no benefit to our health. Period. Now, I don’t want to sound like I’m docking dessert and all that is sweet. I love me some rich, decadent dessert! It’s good for the soul!  But, we have to get real about what we’re eating. A mountain dew and apple Danish are not the answers to healthy living (call me crazy, but it’s true!)

The list of sugar pseudonyms runs long. To name a few undercover agents:

  • corn syrup
  • glucose
  • cellulose
  • cane juice
  • caramel
  • cane sugar
  • confectioner’s sugar
  • castor sugar
  • sorbitol
  • dextrose
  • fructose
  • sucrose
  • maltose (pretty much anything ending in -ose), etc..

While you may not know all the hidden names for sugar, it is important to be aware of what’s going into your body. It’s worth learning and it’s worth doing. Your body will thank you!

So, does this mean I can never eat dessert again? Absolutely not. The beautiful thing is, you can still enjoy sweet foods! The key here, for those simply cutting back on sugar, is moderation.

If you’re completely cutting out all refined sugars (like I have had to do) all hope is not lost! There are some incredible recipes using honey, stevia and agave to concoct some pretty delicious alternatives. (Lately, I have been playing with a new brownie recipe. Look for it in the near future!) Before you know it, the alternative becomes the norm! This is a GOOD thing.

Our bodies (though we’d like to think so) cannot handle the crazy amount of processed sugar we get each day. Whether or not we feel the effects now, we will later on. For some of us, sugar is already causing us a world of hurt through inflammation, arthritic joint pain, diabetes, acne and weight gain. It doesn’t have to be this way.

Remember: We have one body and one life to live. Live it well, by eating well.

Just in Thyme

IMG_5408This weekend, my husband and I are going on a marriage retreat! We have been married a grand total of 7 glorious weeks (yes, we are still very much newlyweds!) and this is a wonderful opportunity to learn more about the other. Before we go, I have to think about what I can take with me for food.  While I sometimes have the option to eat what’s provided, I’m not entirely sure what will be there.

Inspired by Ina Garten, I pulled out some boneless, skinless chicken breasts to thaw as I finished chores around the house. Setting the package in a bowl of warm water will help it thaw more quickly. You can also thaw it in the microwave or have it ready in the fridge the previous night.

As a habit, I try my best to eat only hormone-free, antibiotic-free, humanely raised chicken. While any chicken will do, this helps assure me that I’m not eating anything that could potentially harm my body. I normally buy mine from Publix or Earth Fare. Check your label to be sure!

The beautiful thing about chicken is its versatility. You can eat it simply baked in the oven, or use it in making soups, sandwiches, wraps, chicken salad, etc.. The possibilities are endless with this lean, clean-eating protein! I will be using mine to make wraps for the retreat.

Simple Lemon-Thyme Chicken

You will need:

  • 3-4 Boneless, Skinless Chicken Breasts
  • Half a Lemon
  • 1/4 C. Olive Oil
  • Salt
  • Pepper
  • Ground Thyme
  • 1 Tbsp. Minced Garlic
  1. Preheat your oven to 4oo degrees.
  2. Pat your chicken breasts dry and place in a glass or stoneware baking dish.
  3. Using a sharp knife, make 5-6 tiny holes in each piece of chicken. This will allow it to better absorb the olive oil, lemon and spices.
  4. Drizzle with olive oil.
  5. Squeeze half a lemon evenly over the top.
  6. Using your hands, work the olive oil and lemon into the chicken. Be sure to cover both sides well.
  7. Liberally season with salt, pepper and thyme.
  8. Rub the top of each piece with minced garlic.
  9. Bake for 30-35 minutes or until brown on top with no pink at the center.
  10. Cover with foil and let rest for about 15 minutes. This will keep it moist, allowing the meat to absorb all of the juices in your pan. (Because, who likes dry chicken?)

Simple and quick, this is a great go-to recipe.  It takes little effort, tastes delicious and can be used in a number of different ways! For a healthy and satisfying dinner, serve with roasted vegetables and brown rice. Enjoy!

If Friends Were Flours, I’d Pick You.

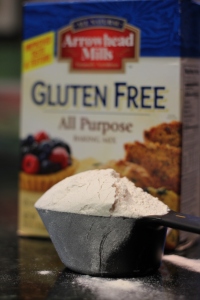
Arrowhead Mills Gluten Free All Purpose

Arrowhead Mills Gluten Free All Purpose Baking Mix

Just thinking about the scent of freshly baked bread makes my tummy rumble. There is nothing like filling your home with the comforting scent of bread baking in the oven. However, for us to enjoy this heavenly scent, we have to have one crucial ingredient in our cupboard: FLOUR.

Being Gluten Free (GF) brings a whole new challenge to the baking scene, particularly when it comes to flour. Not able to reach for your generic all-purpose, you are faced with a slew of foreigners: coconut flour, amaranth flour (what is that, anyway?), gluten free mixes, almond and tapioca flour, brown rice and potato flour, etc. How do you know which kind to use? What brand is best?

After having tried all of the above, I have thus far narrowed it down to three go-to flours: Almond Flour, Coconut Flour and a Gluten Free All Purpose Flour Mix by Arrowhead Mills. Word to the wise: while Bob’s Red Mill has a number of good products, unfortunately their Gluten Free Flour is not one of them. I made the sad mistake of using it for dessert one day and unless you want your ooey-gooey cookies to taste like little iron orbs, go with Arrowhead Mills!

Almond flour is probably my favorite with its nutty, yet slightly sweet flavor, rustic texture and nutritional benefits. It is great used in cookie, muffin and even pancake recipes. For bread recipes, Arrowhead Mills’ GF Flour is ideal. Coconut flour is also great and can be combined with other flours; it can stand on its own, too, but keep in mind that it has a drier consistency when used alone.

You can find these flours at your local health food store, such as Earth Fare or Whole Foods, as well as some regular grocery stores. In fact, Publix and Walmart have started to carry more GF products! Each have their own Gluten Free section where you can find various GF flours and mixes.  If you can’t find them at your local market, below are some links for ordering on-line.

When it comes to storage, I keep both my Gluten Free Flour Mix, as well as my Almond Flour, in the pantry (both should be stored in the fridge or freezer if kept for a lengthy period of time). However, I have found that Coconut Flour is best kept refrigerated right away.

If you have any questions or simply want to share about your own discoveries in baking, feel free to comment!

Happy flour picking!

For more information and on-line ordering, visit these helpful sites:

Coconut Flour:

http://www.amazon.com/Coconut-Secret-Flour-Gluten-Canister/dp/B003XB3NNE/ref=sr_1_8?s=grocery&ie=UTF8&qid=1392935822&sr=1-8&keywords=gluten-free+flours

Almond Flour:

(Remember: Almond Flour and Almond Meal are not the same thing. Almond flour is made using finely ground blanched almonds, while Almond Meal is made with the almond’s skins still remaining and is not always as fine as flour.)

http://www.nuts.com/nuts/almonds/flour.html?utm_source=bing-ads&utm_medium=cpc&utm_group=90-AlmondFlour[3030]&utm_campaign=1-Nuts&utm_term=almond%20flour&utm_type=Exact

Arrowhead Mills All Purpose Gluten Free Flour:

http://www.amazon.com/gp/product/B00061EMNE/ref=pd_lpo_k2_dp_sr_1?pf_rd_p=1535523722&pf_rd_s=lpo-top-stripe-1&pf_rd_t=201&pf_rd_i=B000LKUTUK&pf_rd_m=ATVPDKIKX0DER&pf_rd_r=19AASKQZJN7JPA2H49Z7

Find Your Nearest Health Food Store:

https://www.earthfare.com/

http://www.wholefoodsmarket.com/?reloaded=true

http://sprouts.com/

http://www.naturalgrocers.com/

http://orgharvest.info/

All You Need Is: CHOCOLATE!

Guilt-Free Decadent Dark Chocolate

Guilt-Free Decadent Dark Chocolate

Let’s face it. Who doesn’t like chocolate? It’s the world’s most iconic sweet, the cure for a love sick heart and the epitome of romance. It gives us warm fuzzies and makes us feel loved! Speaking of love and chocolate: it’s almost Valentine’s Day! Chocolate is a scrumptious treat for the “day of love”, not to mention an amazing aphrodisiac!

But… grabbing a box of chocolates from the store, while it may taste great, is not so great for your body. The chocolate itself is full of iron and antioxidants,  but the sugar inside is just waiting to bog you down! Today I whipped up a batch of homemade chocolate that is not only simple, but better (in my humble opinion) than anything you can get at the nearest grocery store.

Whether you’re going out or staying in, below is the perfect recipe for a perfectly divine dessert. Not only does it tastes amazing, it is absolutely guiltless! Does it get any better than that?


DECADENT DARK CHOCOLATE

Serves 6

  • 1 C. Coconut Oil (Melted)
  • 1/4 C. Coconut Milk
  • 1/2 C. Honey
  • 1 tsp. Vanilla
  • 1/4 tsp. Red Pepper
  • 1/2 tsp. Cinnamon
  • 1 C. Special Dark Cocoa Powder
  1. Mix all ingredients together with a whisk.
  2. Line a dish or baking pan with parchment paper.
  3. Then, using a spatula, empty batter into pan.  Be sure to spread the chocolate to all edges, evening out the top.
  4. Optional: Sprinkle sliced almonds or crushed pecans or walnuts on top for a little crunch. Mm!
  5. Pop in the refrigerator for about an hour, or until firmly set.
  6. Delve into your homemade, guilt-free, chocolately goodness!

Store in the refrigerator.